Introduction to JavaScript
Welcome!
Girl Develop It is here to provide affordable and accessible programs to learn software through mentorship and hands-on instruction.
Some "rules"
- Every question is important
- Help each other
- Have fun
- Learn and return
Student introductions
- What's your name?
- Share one idea you have for an app or website that you want to build!
- What's one question you have about JavaScript?
Bookmark these slides:
gdila.github.io/intro-javascript
Follow along with us on your computer!
What is JavaScript?
A quirky but powerful and ubiquitous programming language -- it's built into every modern web browser!
Originally a client-side language for making websites more interactive, but now so much more!
Popularity of programming languages as of June 2016
Stats by RedMonk, based on data from GitHub and StackOverflow
Some fun JavaScript tools and libraries:
Let's build something with JavaScript!
What do we need to build this app?
HTML
CSS
JavaScript
What does our JavaScript code need to do for this app?
Get user input from the HTML <input> elements
Combine user input with our Mad Lib story
Show finished Mad Lib when user clicks the button
...but how do we do all that??
Today's JavaScript concepts:
- Using your web browser's console
- Variables
- Data types, starting with strings
- Combining strings (concatenation)
- Linking JavaScript files to HTML files
- Built-in JavaScript functions
- Creating your own functions
- Using JavaScript to access HTML elements
- JavaScript event listeners
How to open your web browser's JavaScript console:
- Chrome:
- Windows: Ctrl + Shift + J
- Mac: Cmd + Opt + J
- Firefox:
- Windows: Ctrl + Shift + K
- Mac: Cmd + Opt + K
- Safari / Mac: Cmd + Opt + C
- Note: first you may need to enable web inspector (see instructions here)
So what are variables?
A variable is a symbolic name for a piece of information that can change over time.
var myName = 'Sally Awesomepants';
Try it out! Copy and paste this code into your console. To run your code, hit enter.
Important notes on variables:
- Use the
varkeyword to define a new variable - New variables need to have unique names
- Variable names are CASE SENSITIVE, cannot contain spaces, and cannot begin with numbers
- Bonus link: "What characters are valid for JavaScript variable names?" (the answer might surprise you!)
Creating new variables
Variables can be created with an initial value or without any value at all (undefined):
var favoriteAnimal = 'penguin';
var favoriteColor;
Try it out! Run this code, then type each variable name (don't forget to press "enter"!) and the console will show their values.
Changing the value of a variable
After a variable has been created, you can change it without using the var keyword:
var favoriteFood = 'salad';
// Actually, I changed my mind!
favoriteFood = 'pizza';
Try it yourself in the console!
JavaScript comments
Comments are ignored by the computer but very useful for us humans to keep our code organized:
// This is a single-line comment.

/*	This is a multi-line comment!

  Comments help us humans stay sane. You can use them for:
  - notes to explain how your code works
  - to-do lists and reminders
  - links to sources or references, like this one about JS comments:
    https://developer.mozilla.org/en-US/docs/Web/JavaScript/Reference/Lexical_grammar#Comments
*/
Single-line comments start with //
Multi-line comments start with /* and end with */
Data types
Variables can contain different types of data, like strings, numbers, and more!
var adjective = 'purple';
var favoriteNumber = 3;
The computer stores everything as 1s and 0s, but it interprets the 1s and 0s differently depending on what data type they are.
For example: "0001" might represent the number 1, the letter A, the value TRUE, or something else!
A chunk of text is called a string
Strings are a bunch of symbols strung together into a sentence, just like alphabet beads on a necklace.
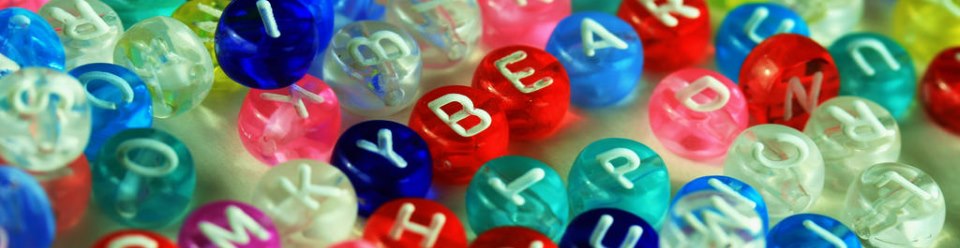
Strings are always surrounded by quote marks, either single (' ') or double (" ").
It doesn't matter which you choose, as long as the opening and closing quote marks match!
Photo by Wendy (smkybear) on Flickr
What if your string contains a quote mark?
Since strings are always surrounded by quote marks, if your string also contains a quote mark,
you'll run into trouble!
var brokenString = 'I think I'm doing this wrong!';
Try it out in the console. Did you get an error?
Let's see how to fix it...
Solution 1: Use different quote marks
You can use double (" ") quote marks to surround a string containing a single quote:
var fixedString1 = "I think I'm doing this right!";
Or vice versa, you can use single quotes (' ') to surround a string containing a double quote:
var fixedString2 = 'I shouted "Yay!" when it worked.';
Solution 2: Escaping characters
You can escape special characters like quote marks by adding a backslash (\) in front of them:
var fixedString3 = 'Yay, I\'m escaping strings!';
Escape notation is also used for printing special characters like tab (\t) and new line (\n).
See more on strings in this reference page.
Connecting strings together
So you've already defined some strings like favoriteAnimal and favoriteFood, but how can you combine them into a sentence?
var sentence = 'My name is ' + myName + ' and I rock!';
Try it! Run this code in your console. Then type "sentence" and hit enter, and you'll see the output:
I am Sally Awesomepants and I rock!
Note: The console remembers the myName variable that you defined earlier, because it's saved in memory until you close your browser tab. Neat, huh?
Now run this code in your console:
var madLib = 'Yesterday I found a ' + adjective + ' ' + favoriteAnimal + ' with ' + favoriteNumber + ' eyes eating ' + favoriteFood + ' on my dining table and writing JavaScript on my computer! It wrote some code that concatenated strings, so I ran the code and the ouput was: ' + sentence;
After running the code, remember to type madLib and hit enter to see the value of the madLib string!
Combining strings = concatenation
The fancy technical term for combining strings is called concatenation. Say that ten times fast!
When used with strings, the + symbol is called the concatenation operator.
Challenge: Write your own Mad Lib
- Go to this website: repl.it/languages/javascript
- Create your own Mad Lib story based on this example: repl.it/EArM
- Click "Run" at the top to test it. Make sure your code includes
console.log(madLib);at the end! - When you're done, click "Save" at the top and when it asks you to log in, click "continue as Anonymous" (the small text at the bottom of the popup)
- Click "Share" at the top, copy the link, and paste it into here with your name: goo.gl/ELnYzm
- Try each others' Mad Libs and have a good laugh!
JavaScript Files
Let's set up our project
- Create a new folder named
madlibssomewhere easy to find (maybe on your Desktop) - Open up your text editor (like Atom or Sublime)
- Create a new HTML file called
index.htmland save it in your madlibs folder - Create a new CSS file called
style.cssand save it in your madlibs folder - Create a new JavaScript file called
madlibs.jsand save it in your madlibs folder
Copy this into your index.html file:
<!DOCTYPE html>
<html>
	<head>
		<title>Mad Libs! (Girl Develop It LA - Intro to JavaScript)</title>
		<meta charset="utf-8">
		<meta name="viewport" content="width=device-width">
		<link href="style.css" rel="stylesheet" type="text/css">
		<link href="https://fonts.googleapis.com/css?family=Waiting+for+the+Sunrise" rel="stylesheet">
	</head>

	<body>
		<h1>Mad Libs!</h1>

		<div id="madlib"></div>

		<strong>Noun</strong> (ex: tree, person): <input type="text" id="noun" class="fill">
		<strong>Past Tense Verb</strong> (ex: jumped, ate): <input type="text" id="verb" class="fill">
		<strong>Adjective</strong> (ex: happy, purple): <input type="text" id="adjective" class="fill">

		<button id="submit">Create Mad Lib</button>

		<p class="small">Based on a practice project from <a href="https://dash.generalassemb.ly/">Dash by General Assembly</a></p>

		<script src="madlibs.js"></script>
	</body>
</html>
Copy this into your style.css file:
body {
	font-family: 'Helvetica', 'Arial', sans-serif;
	margin: 0 auto;
	text-align: center;
	padding: 0 20px;
	max-width: 800px;
	font-size: 25px;
	background: #efefef;
}

button {
	font-size: 25px;
	font-weight: bold;
	padding: 10px;
	margin: 10px;
}

input.fill {
	display: block;
	width: 400px;
	max-width:95%;
	margin:0 auto;
	margin-bottom: 20px;
	box-sizing: border-box;
}

.fill {
	font-size: 30px;
	font-weight: bold;
	font-family: 'Waiting for the Sunrise', cursive;
	letter-spacing: 5px;
	background: white;
	color: red;
	margin-left: 4px;
	margin-right: 4px;
	padding: 5px 15px;
}

#madlib {
	font-size: 30px;
	line-height: 2.5;
	margin-top: 20px;
	margin-bottom: 40px;
}

h1 {
	font-size: 80px;
	margin: 0;
	color: red;
	font-family: 'Waiting for the Sunrise', cursive;
	font-weight: bold;
	letter-spacing: 7px;
}

.small {
	font-size:0.5em;
	font-style: italic;
	margin-top: 30px;
}
How to link your JS and HTML files
In our HTML file, we use the <script> tag with the src attribute at the end of the body element to link it with our JavaScript file:
	<html>
<!DOCTYPE html>
	<head>

	</head>
	<body>


		<script src="madlibs.js"></script>
	</body>
</html>
Note that here we assume madlibs.js is in the same folder as the HTML file that's linking to it.
JavaScript Functions
Meet your first built-in function: console.log!
Paste this code into your madlibs.js file, save it, and then open index.html in your web browser:
console.log('Hello world!');
Now open the browser console. You should see the message "Hello world!"
The console.log function displays information in the console. Use it to confirm that your code is doing what you think it's doing!

This log of information is similar to the logbooks used by ship captains to track important events.
Fun fact: most web browsers support fancy customizations, like styling the messages with CSS!
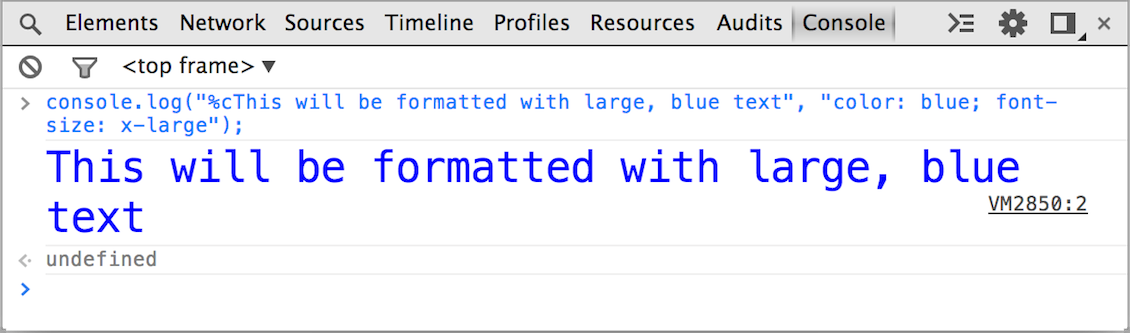
See more advanced tricks in Chrome's documentation
So what are functions?
A function is a reusable chunk of code that performs a particular action.

In mathematics, a function transforms input(s) into output. But for JavaScript functions, the inputs and output are optional.
Running functions
To run or call a function, type its name followed by
( ); with any inputs listed inside the parentheses:
// One string input:
console.log('I am a string');

// Three string inputs:
console.log('string1', 'string2', 'string3');

// Or no inputs at all:
console.log();
Functions in JavaScript can take zero, one, or more inputs separated by commas.
Function inputs
Any variable or data type can be used as input for a function, and you can mix and match:
var favoriteNumber = 5;
// Using a variable containing a number as input:
console.log(favoriteNumber);

var animal = 'penguins';
// You can mix and match data types:
console.log('I found ', favoriteNumber, animal);
JavaScript functions can even take other functions as their inputs! But more on that later.
Defining your own custom functions
JavaScript has lots of built-in functions, but you can also create your own!
// Defining a function called shout:
function shout (phrase) {
	console.log(phrase + '!!!');
}

// Running (or calling) the function:
shout('I love JavaScript');
shout('Functions rock');
Try it out! First you define your function, and then you can call it as many times as you want.
Parts of a function definition
function shout (phrase) {
   console.log(phrase + '!!!');
}
- The
functionkeyword - The name of the function (follow same naming rules as variables)
- Parentheses containing optional inputs (called parameters)
- Curly brackets containing the code that it will run (called the function body)
Defining a function with multiple parameters:
// Defining a function with 3 parameters:
function displayThreeWords (word1, word2, word3) {
	console.log(word1 + ' ' + word2 + ' ' + word3);
}
Running the function with multiple arguments:
// Running the function with 3 arguments:
displayThreeWords('pineapple', 'motorboat', 'toothbrush');
Parameters vs arguments
Here's a handy way to remember it:
- The parameter is the parking space
- The argument is the automobile
// 3 parameters, don't know the values yet:
function displayThreeWords (word1, word2, word3) {
	console.log(word1 + ' ' + word2 + ' ' + word3);
}

// 3 arguments, specific values:
displayThreeWords('pineapple', 'motorboat', 'toothbrush');
Returning outputs
To get an output from your function, use the return keyword followed by the output value:
// Define a function with 1 parameter and an output:
function shout (phrase) {
	return phrase + '!!!';
}

// Run the function and save the output to a variable
var myResult = shout('I got some output');

// Display the output
console.log(myResult);
Try it out! Notice that now we can save the results of our function, not just display them in the console.
Return vs console.log
Keep in mind that console.log displays information but doesn't save it.
So if you want to use the output from your function later on, you need to return it!
Pair Programming Challenges:
- Define a function called
sayHellothat takes no input parameters and returns as output a string that says hello to the world. - Define a function called
makeHeadingthat takes one parameter, surrounds it inside"<h1>"and"</h1>", and returns the combination as its output. - Call the
sayHellofunction and save its output in a new variable calledgreeting. - Call the
makeHeadingfunction, passing it yourgreetingvariable as an argument, and save its output ingreeting(overriding its old value). - Display this final result in the console. Beautiful!
Challenge: Refactor our Mad Libs
- Choose a random new Mad Lib story from our list of links here: goo.gl/ELnYzm
- Scroll to the bottom and change the code so the Mad Lib is created inside a function that takes the input words (like "noun", etc) as parameters and returns the Mad Lib as its output.
- At the top of the page, delete the input variables (like "noun", etc) and replace them all with a single call to your new function, providing it with specific strings as its arguments.
- Display the output of the function in the console.
- Click "Run" to test it out, click "Save" when you're done, and then click "Share", copy the link, and paste it back into here: goo.gl/ELnYzm
Great work, coding ninjas!
Now let's review our project goals again
What does our JavaScript code need to do for this app?
Get user input from the HTML <input> elements
Combine user input with our Mad Lib story
Show finished Mad Lib when user clicks the button
...we're almost there!
Manipulating HTML elements with JavaScript
The Document Object Model (DOM)
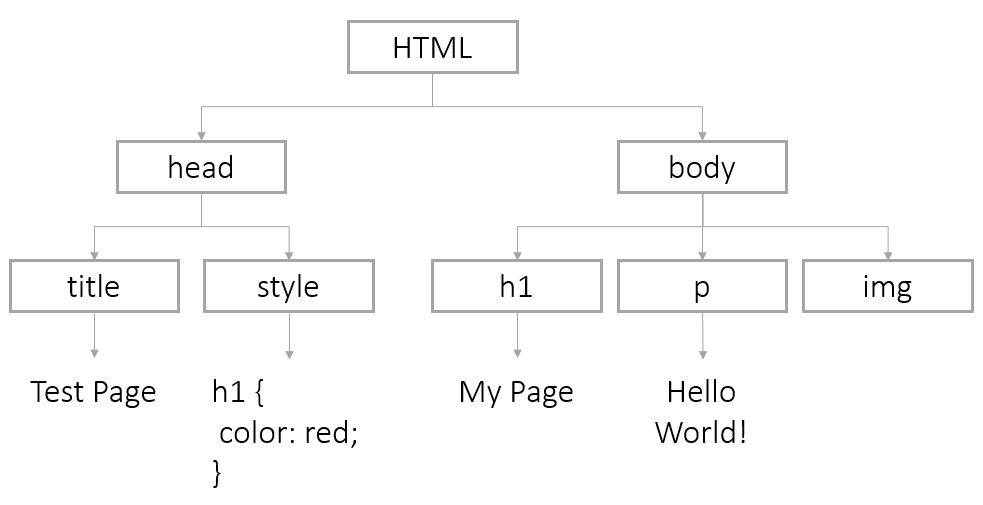
The Document Object Model (DOM)
The DOM organizes HTML pages as a hierarchy of elements, just like the file system on our computers.
It's built into every web browser to let developers
(like us!) modify the contents of our web pages.
Document: Root of the tree
The root of the hierarchy/tree is the document object, which contains all the other objects that
represent our HTML elements.
// Try opening your Mad Libs index.html in your browser,
// and run this in the console to see what's inside:
console.dir(document);
Each of these objects contains properties like the text content of the HTML elements, their HTML attributes, and their CSS styles.
OK, the Document Object Model sounds cool!
But what are objects?
So far we've worked with simple variables, but what if we have a whole bunch of them?
var myName = "Sally Awesomepants";
var myProfession = "full-stack JavaScript developer";
var myAge = 32;
var myFavColor = "purple";
var myFavFood = "pizza";
var myFavAnimal = "penguin";
var myFavNumber = 3;
If you have to track this data for hundreds of people, how would you even remember the names of all these variables?! There must be a better way!
Objects: bags of related variables
You can think of an object as a bag full of variables, just a convenient way to carry them all together:
var me = {
	name: "Sally Awesomepants",
	profession: "full-stack JavaScript developer",
	age: 32,
	favColor: "purple",
	favFood: "pizza",
	favAnimal: "penguin",
	favNumber: 3
};
console.log("Hi, I'm " + me.name + ", a "
	+ me.age + "-year-old " + me.profession + "!");
This is just one of the ways to create an object, called object literal notation. But more on that later.
Not only can objects contain variables, but they can even contain their own functions!
var myObject = {
	myProperty: "Here is some data!",
	myMethod: function () {
		console.log('Function inside an object!');
	}
}

// Access a property of our object:
console.log(myObject.myProperty);

// Run a method of our object:
myObject.myMethod();
Tech jargon tip:
when inside an object, its variables are called properties, and its functions are called methods.
Let's "hack" Google!
Go to Google.com and then open your browser console once you're on their homepage.
Next, run this code in the console:
document.body.textContent = 'You got hacked!';
OK, just kidding!
Thankfully, it's not that easy to hack a website. These changes are temporary, and they only appear on your computer; nobody else will see them.
The textContent property
Every element in the DOM has a textContent property that contains the text inside the HTML element it represents. Let's try this out:
// Put this code in your madlibs.js file, then save it
// and open your index.html file in your web browser.
var bodyText = document.body.textContent;
console.log(bodyText);

// SHORTCUT: you could also combine those two lines of code,
// no variable needed:
// console.log( document.body.textContent );
Interesting, right? That's all the text in your web page, without the HTML tags! This can be useful...
But what if we want the text of just
one element, not the whole body?
First we need a way to identify it! One way is with document.getElementById(), a built-in method of the document object for finding one particular element:
var myElement = document.getElementById('test');
It takes one string as an argument, which should match the ID of the HTML element you want to get.
Let's try document.getElementById!
Change me!
The HTML for the box on this page is:
<p id="changebox">Change me!</p>Let's change its text! Open your browser console while you're on this slide and try running this code:
// Identify the box by its ID:
var box = document.getElementById('changebox');

// Display its current text content:
console.log(box.textContent);

// Change its text content:
box.textContent = 'Voila! JavaScript magic!';
Now try it again, but with an input box!
The HTML for this input box:
<input id="changeinput" value="Change me!">Close and reopen your browser console, then try:
// Identify the input box by its ID:
var input = document.getElementById('changeinput');

// Notice that its text content is empty!
console.log(input.textContent);

// We need to use the value property instead:
console.log(input.value);

// Change its value:
input.value = 'new value!';
textContent vs value
So just remember: you need to use the value property to get the text inside any form elements.
For pretty much all other types of HTML elements, the textContent property will work fine.
Pair Programming Challenge:
Get the value of each Mad Lib input
1) Look inside your index.html file and find the IDs of each input box; you're gonna need them!
2) Create a JavaScript variable containing the value of each input box in your madlibs.js file by using the getElementById method of the document object.
Be sure to look through the previous slides to review what we've learned so far. And don't be afraid to experiment and break stuff; that's the best way to learn!
Solution
// Get the values of HTML input boxes
// with the IDs "noun", "verb", and "adjective"
var noun = document.getElementById('noun').value;
var verb = document.getElementById('verb').value;
var adjective = document.getElementById('adjective').value;

// For testing purposes, display the values in the console
console.log(noun, verb, adjective);
Save your madlibs.js file, open index.html in the browser, write some text in the input boxes, and then open the console!
It didn't work! Why not?
Oh yeah, our code runs as soon as we go to our web page (index.html), before we can type anything into the input boxes! Order of events matters!
When should our code run?
When the user clicks the button.
Let's make it happen!
First, let's look at the bigger picture:
Event-Based Programming
Procedural Code
- Code runs when you start the program
- Predictable, runs in the same order every time
- Common in beginner tutorials, probably what you're used to
Event-Based Code
- Code runs when an event triggers it (like user input)
- Can't predict when code will run or in what order
- Probably new to you, and it will feel a bit weird!
The Event Loop

The event loop is some code that is constantly running in the background. It checks if any events have happened and runs your code at the right time.
Event-based programming is everywhere!
Anywhere you deal with user input, you'll see
event-based programming.
It's built into every web browser too!
There are lots of events built into JavaScript.
See the MDN event reference page for a gigantic list!
Events can trigger other events

You can create chain reactions in your code, not unlike a row of dominoes!
But sometimes it's hard to get
it working

Event-based programming can be harder to learn and harder to debug, so be prepared for some frustration.
Let's look at some code!
JavaScript Event Listeners
Breakdown of the
JavaScript Event Listener
document.addEventListener('click', myFunction);

function myFunction(event) {

	console.log(event);

}
There are five parts to a standard JavaScript
event listener
Part 1: Where the events will happen
(in this case, the whole HTML document object)
Part 2: Start listening for events
(with JavaScript's built-in addEventListener method)
Part 3: The type of event
(see this reference list or make up your own)
Part 4: The name of the function to run
when the event happens
(known as the "callback" function)
Part 5: This parameter receives an object with info about the event
(different events give you different information)
Let's try it! Open your console and run this code, then click on the page and check the console again.
Behold! Event data!
You should see a MouseEvent object in the console. Click to expand the data:
Each event has different properties, which you can use to control all sorts of cool things!
But more on that later.
Let's finish our Mad Libs project!
What does our JavaScript code need to do for this app?
Get user input from the HTML <input> elements
Combine user input with our Mad Lib story
Show finished Mad Lib when user clicks the button
...last piece of the puzzle!
Your code in madlibs.js should look like this so far:
// Get the values of HTML input boxes
// with the IDs "noun", "verb", and "adjective"
var noun = document.getElementById('noun').value;
var verb = document.getElementById('verb').value;
var adjective = document.getElementById('adjective').value;

// For testing purposes, display the values in the console
console.log(noun, verb, adjective);
Challenge: Working Mad Libs, Part 1
- In
madlibs.js, take all the code (shown on the last slide) and put it all inside a new function calledshowMadLibthat takes no parameters. - Define another function called
createMadLib, which takes 3 parameters (noun, verb, and adjective), combines them into a sentence, and returns the combined string as output. - Inside your
showMadLibfunction, create a variable calledmadLiband set its value equal to the result of callingcreateMadLibwithnoun,verb, andadjectiveas its arguments.
Part 1 Solution
function showMadLib() {
	// Get the values of HTML input boxes with the IDs "noun", "verb", and "adjective"
	var noun = document.getElementById('noun').value;
	var verb = document.getElementById('verb').value;
	var adjective = document.getElementById('adjective').value;

	// For testing purposes, display the values in the console
	console.log(noun, verb, adjective);

	// Make the Mad Lib and save it to a variable
	var madLib = createMadLib(noun, verb, adjective);
}

function createMadLib(noun, verb, adjective) {
	return 'Bob robbed the bank with a deadly ' + noun + ', but then his ' + adjective + ' girlfriend ' + verb + ' the cash!';
}
Challenge: Working Mad Libs, Part 2
- Inside your
showMadLibfunction (at the end of it), usedocument.getElementByIdto create a JavaScript object for the HTML element<div id="madlib"></div> - Right after that (also inside the showMadLib function), set that object's
textContentequal to your finished Mad Lib string.
Part 2 Solution
function showMadLib() {
	// Get the values of HTML input boxes with the IDs "noun", "verb", and "adjective"
	var noun = document.getElementById('noun').value;
	var verb = document.getElementById('verb').value;
	var adjective = document.getElementById('adjective').value;

	// For testing purposes, display the values in the console
	console.log(noun, verb, adjective);

	// Make the Mad Lib and save it to a variable
	var madLib = createMadLib(noun, verb, adjective);

	// Make a JavaScript object for the HTML element with id "madlib"
	var madLibContainer = document.getElementById('madlib');

	// and change its contents to contain our madLib string
	madLibContainer.textContent = madLib;
}

function createMadLib(noun, verb, adjective) {
	return 'Bob robbed the bank with a deadly ' + noun + ', but then his ' + adjective + ' girlfriend ' + verb + ' the cash!';
}
Challenge: Working Mad Libs, Part 3
- Look inside your
index.htmlfile and identify the ID of the submit button. - At the very end of
madlibs.js(not inside any functions), usedocument.getElementByIdagain to create a JavaScript object for the submit button. - Right below that, set an event listener on the button! You can just copy-paste our event listener example code, but replace
documentwith your button object. - Make sure that the second argument of your event listener should be the name of your custom function
showMadLib. - Save the file and test it out!
Part 3 Solution
// *** PART 3 CODE (this can be at the top of the file or at the bottom, doesn't matter):

// Make a JavaScript object for the HTML submit button
var submitButton = document.getElementById('submit');

// When submit button is clicked, run the showMadLib function
submitButton.addEventListener('click', showMadLib);

// *** THE REST IS THE SAME AS SOLUTION 2:

function showMadLib() {
	// Get the values of HTML input boxes with the IDs "noun", "verb", and "adjective"
	var noun = document.getElementById('noun').value;
	var verb = document.getElementById('verb').value;
	var adjective = document.getElementById('adjective').value;

	// For testing purposes, display the values in the console
	console.log(noun, verb, adjective);

	// Make the Mad Lib and save it to a variable
	var madLib = createMadLib(noun, verb, adjective);

	// Make a JavaScript object for the HTML element with id "madlib"
	var madLibContainer = document.getElementById('madlib');

	// and change its contents to contain our madLib string
	madLibContainer.textContent = madLib;
}

function createMadLib(noun, verb, adjective) {
	return 'Bob robbed the bank with a deadly ' + noun + ', but then his ' + adjective + ' girlfriend ' + verb + ' the cash!';
}
Congrats! You're mastering JavaScript!
Let's add one final touch to make the Mad Lib prettier...
textContent vs innerHTML
The textContent property lets us change the plain text inside an HTML element, but the innerHTML property lets us use HTML as well as text!
// Copy this code, go to Google.com again,
// open your console and run this code:
document.body.innerHTML = '<h1>Hello world!</h1> <img src="http://i2.kym-cdn.com/photos/images/original/000/114/779/0002.gif">';
Fun, isn't it?? Just don't abuse your new super powers!
Prettify your Mad Lib
In your madlibs.js file, replace madLibContainer.textContent with madLibContainer.innerHTML.
Then surround the noun, verb, and adjective in your Mad Lib string with <span class="fill"></span> HTML tags like this:
function createMadLib(noun, verb, adjective) {
	return 'Bob robbed the bank with a deadly
	' + noun + ',
	 but then his ' + adjective
	  + ' girlfriend '
	 + verb + ' the cash!';
}
Save it, open index.html in your browser again, and try it out! Now it's using the custom CSS in your style.css file!
Let's learn more stuff!
Numbers
Variables can be numbers, either integers or floats (decimals).
var numberOfKittens = 5;
var cutenessRating = 9.6;
The browser will automatically convert integers to floats if needed
Arithmetic Operators
Once you have numbers, you can do math with them!
var numberOfKittens = 5;
var numberOfPuppies = 4;
var numberOfAnimals = numberOfKittens + numberOfPuppies;
Arithmetic Operators
| Example | Name | Result |
|---|---|---|
| -a | Negation | Opposite of a. |
| a + b | Addition | Sum of a and b. |
| a - b | Subtraction | Difference of a and b. |
| a * b | Multiplication | Product of a and b. |
| a / b | Division | Quotient of a and b. |
| a % b | Modulus | Remainder of a divided by b. |
Let's Develop It!
Create two variables and try some arithmetic operators. Don't forget to display your results!
Review
In this code, spot the comments, variables, operator, function, argument, and return value.
function calculateTip(total) {
	var tipPercent = 0.15; //Can be changed
	return (total * tipPercent);
}

var billPreTip = 10;
var billTip = calculateTip(billPreTip);
var receipt = 'Meal: ' + billPreTip + ' Tip: ' + billTip +
' Total: ' + (billPreTip + billTip);
console.log(receipt);
Variable Scope
The scope of a variable is how long the computer will remember it.
Global Scope
A variable declared outside a function has a global scope and can be accessed anywhere, even in a function.
var awesomeGroup = 'Girl Develop It'; //Global scope

function whatIsAwesome() {
	console.log (awesomeGroup + ' is pretty awesome.'); //Will work
}

whatIsAwesome();
Local Scope
A variable declared within a function has a local scope and can only be accessed within that function.
function whatIsAwesome() {
	var awesomeGroup = 'Girl Develop It'; //Local scope
	console.log ('I made a variable called awesomeGroup with a value of ' + awesomeGroup); //Will work
}

whatIsAwesome();
console.log (awesomeGroup + ' is pretty awesome.'); //Won't work
Boolean Variables
Boolean variables represent the logical values True and False
var catsAreBest = true;
var dogsRule = false;
If you try to use another variable as a boolean, JavaScript will guess. The number 0, the empty string '', undefined, and null are considered false, everything else reads as true.
The if statement
Use if to decide which lines of code to execute, based on a condition.
if (condition) {
	// statements to execute
}
var bananas = 5;
if (bananas > 0) {
console.log ('You have some bananas!');
}Comparison Operators
| Example | Name | Result |
|---|---|---|
| a == b | Equal | TRUE if a is equal to b (can be different types). |
| a === b | Identical |
TRUE if a is equal to b, and the same type. |
| a != b | Not equal | TRUE if a is not equal to b (can be different types). |
| a !== b | Not identical |
TRUE if a is not equal to b, or they are not the same type. |
| a < b | Less than | TRUE if a is strictly less than b. |
| a > b | Greater than | TRUE if a is strictly greater than b. |
| a <= b | Less than or equal to | TRUE if a is less than or equal to b. |
| a >= b | Greater than or equal to | TRUE if a is greater than or equal to b. |
Watch out!
Don't mix up = and ==
Let's Develop It!
Make a variable called "temperature." Write some code that tells you to put on a coat if it is below 50 degrees.
The if/else statement
Use else to provide an alternate set of instructions.
var age = 28;
if (age >= 16) {
	console.log ('Yay, you can drive!');
} else {
	console.log ('Sorry, but you have ' + (16 - age) + ' years until you can drive.');
}
The if/else if/else statement
If you have multiple conditions, you can use else if.
var age = 20;
if (age >= 35) {
	console.log('You can vote AND hold any place in government!');
} else if (age >= 25) {
	console.log('You can vote AND run for the Senate!');
} else if (age >= 18) {
	console.log('You can vote!');
} else {
	console.log('You can\'t vote, but you can still write your representatives.');
}
Let's Develop It!
Modify your "wear a coat" code for these conditions:
- If it is less than 50 degrees, wear a coat.
- If it is less than 30 degrees, wear a coat and a hat.
- If it is less than 0 degrees, stay inside.
- Otherwise, wear whatever you want.
Logical Operators
| Example | Name | Result |
|---|---|---|
| a && b | And | TRUE if both a and b are TRUE. |
| a || b | Or | TRUE if either a or b is TRUE. |
| ! a | Not | TRUE if a is not TRUE. |
Using logical operators
You can use these operators to combine conditions.
var bananas = 5;
if (bananas >=2 && bananas <7) {
	console.log ('You have a reasonable number of bananas');
} else {
	console.log ('Check your banana supply');
}
Let's Develop It!
Add a logical operator to your what to wear program.
While loops
While will repeat the same code over and over until some condition is met.
var bottlesOfBeer = 99;
while (bottlesOfBeer >= 1) {
	console.log (bottlesOfBeer + ' bottles of beer on the wall');
	bottlesOfBeer = bottlesOfBeer - 9;
}
Infinite Loops
Make sure something changes in the loop, or your loop will go on forever...
For loops
For loops are very similar, but you declare a counter in the statement.
//will count 1 to 10
for (var i = 1; i <= 10; i++) {
	console.log (i);
}
Loops and logic
You can add other statements or logical operators inside the loops.
//Count from 1 to 50
for (var i = 1; i <= 50; i++) {
	console.log (i);
	//Says 'Buzz' after multiples of three
	if (i % 3 == 0) {
		console.log (' Buzz');
	}
	//Says 'Bang' after multiples of five
	if (i % 5 == 0) {
		console.log (' Bang');
	}
}
Break
To exit a loop, use the break statement.
//Count from 100 to 200
for (var i = 100; i <= 200; i++) {
	console.log('Testing ' + i);
	//Stop at the first multiple of 7
	if (i % 7 == 0) {
		console.log('Found it! ' + i);
		break;
	}
}
Let's Develop It!
Write a loop that gives you the 9's times table,
from 9 x 1 = 9 to 9 x 12 = 108.
Finish early? Try using a loop inside a loop to write all the times tables, from 1 to 12.
Arrays
Arrays are ordered lists of values.
var arrayName = [element0, element1, ...];You can put different types of data into an array.
var rainbowColors = ['Red', 'Orange', 'Yellow', 'Green',
'Blue', 'Indigo', 'Violet'];
var lotteryNumbers = [33, 72, 64, 18, 17, 85];
var myFavoriteThings = ['Broccoli', 1024, 'Sherlock'];
Array Length
The length property tells you how many things are in an array
var rainbowColors = ['Red', 'Orange', 'Yellow', 'Green',
'Blue', 'Indigo', 'Violet'];
console.log(rainbowColors.length);
Using Arrays
You can access items with "bracket notation" by using the position of the object you want. Programmers start counting at zero.
var rainbowColors = ['Red', 'Orange', 'Yellow', 'Green', 'Blue', 'Indigo', 'Violet'];
var firstColor = rainbowColors[0];
var lastColor = rainbowColors[6];
Changing arrays
You can use bracket notation to change an item in an array
var myFavoriteThings = ['Broccoli', 1024, 'Sherlock'];
myFavoriteThings[0] = 'Asparagus';
Expanding arrays
Arrays do not have a fixed length. You can use "push" to add something to an array.
var myFavoriteThings = ['Broccoli', 1024, 'Sherlock'];
myFavoriteThings.push('Dancing');
Let's Develop It!
Create an array of your favorite foods. Echo a few values onto your screen.
Iterating through arrays
Use a for loop to easily process each item in an array.
var rainbowColors = ['Red', 'Orange', 'Yellow', 'Green', 'Blue', 'Indigo', 'Violet'];
for (var i = 0; i < rainbowColors.length; i++) {
	console.log(rainbowColors[i]);
}
Let's Develop It!
Use a loop to make a list of all your favorite foods.
Objects
Objects let us store a collection of properties.
var objectName = {
	propertyName: propertyValue,
	propertyName: propertyValue,
	...
};
var aboutMe = {
hometown: 'Corry, PA',
hair: 'Blond',
likes: ['coding', 'knitting', 'chocolate'],
birthday: {month: 3, day: 27}
};Let's Develop It!
Let's work together to create some code that describes the properties of some safari animals.
Accessing Objects
You can retrieve values using "dot notation"
var aboutMe = {
	hometown: 'Corry, PA',
	hair: 'Blond'
};
var myHometown = aboutMe.hometown;
Or using "bracket notation" (like arrays)
var myHair = aboutMe['hair'];Changing Objects
You can use dot or bracket notation to change properties
var aboutMe = {
	hometown: 'Corry, PA',
	hair: 'Blond'
};
aboutMe.hair = 'pink';
Add new properties
aboutMe.eyes = 'blue';Or delete them
delete aboutMe.eyes;Arrays of Objects
Since arrays can hold any data type, they can also hold objects
var myCats = [
	{name: 'Mabel',
	age: '6'},
	{name: 'Ollie',
	age: '2'}
];

for (var i = 0; i < myCats.length; i++) {
	var myCat = myCats[i];
	console.log(myCat.name + ' is ' + myCat.age + ' years old.');
}
Arrays of Objects
Just like other data types, objects can be passed into functions:
var mabelTheCat = {
	age: 6,
	furColor: 'grey',
	likes: ['catnip', 'naps', 'snacks'],
	birthday: {month: 11, day: 25, year: 2009}
}

function describeCat(cat) {
	console.log('This cat is ' + cat.age + ' years old with ' + cat.furColor + ' fur.');
}

describeCat(mabelTheCat);
Let's Develop It!
Create an object to hold information on your favorite recipe. It should have properties for recipeTitle (a string), servings (a number), and ingredients (an array of strings).
Try displaying some information about your recipe.
Bonus: Create a loop to list all the ingredients.
Object Methods
Objects can also hold functions.
var mabelTheCat = {
	age: 6,
	furColor: 'grey',
	meow: function() {
		console.log('meowww');
	},
	eat: function(food) {
		console.log('Yum, I love ' + food);
	},
};
Call object methods using dot notation:
mabelTheCat.meow();
mabelTheCat.eat('brown mushy stuff');
Let's Develop It!
Let's work together to add some methods to our code that describes the safari animals.
Built-in objects
JS provides several built-in objects:
Questions about objects?
Resources
- Another version of Girl Develop It Intro to JavaScript slides
- JavaScript Guide, from the Mozilla Developers Network.
- Code Academy, with interactive JavaScript lessons to help you review.
- Share your favorites! And email us if you're looking for more recommendations.